
Installing JBoss Web Server 8.0 on RedHat Linux
JBoss Web Server is a modern, lightweight, and robust web server based on the Apache HTTP Server and Apache Tomcat projects. It’s designed to provide a stable and secure platform for hosting web applications, with advanced features like load balancing, clustering, and web services support.
Before we begin, it’s important to note that this tutorial assumes you have a Red Hat Enterprise Linux (RHEL) or a derivative distribution like CentOS installed and configured. Additionally, you should have a non-root user with sudo privileges set up for security reasons.
Step 1: Install Java (Optional if you already have a supported JDK)
JBoss Web Server requires Java to be installed on your system. You can install the OpenJDK package using the following command:
sudo dnf install java-17-openjdkVerify the Java installation by checking the version:
java -versionHere is a step-by-step tutorial if you need it: How to install Java17 on Linux
Step 2: Download JBoss Web Server
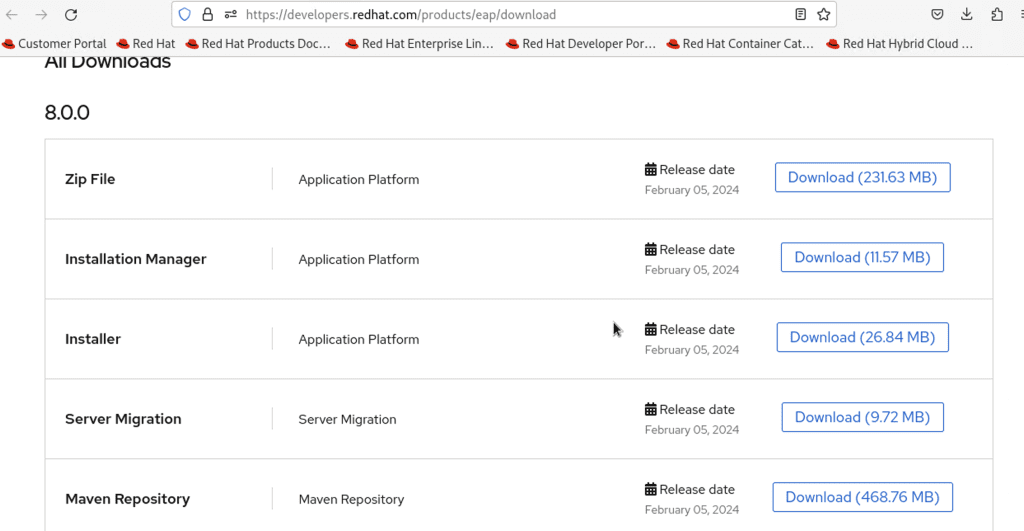
Visit the JBoss Web Server download page (https://developers.redhat.com/products/web-server/download) and download the latest version of the server for your Red Hat distribution. Download the Zip File.
Step 3: Create a Dedicated User and Group
It’s considered a best practice to run JBoss Web Server as a dedicated, non-root user for security reasons. Create a new user and group using the following commands:
sudo groupadd -r jboss
sudo useradd -r -g jboss -d /opt/jboss -s /sbin/nologin jboss
This creates a new group named jboss and a user named jboss with its home directory set to /opt/jboss.
Step 4: Extract the JBoss Web Server Archive
Move the downloaded JBoss Web Server archive to the /opt/jboss directory and extract it:
sudo mv jboss-eap-8.0.*.zip /opt/jboss/
sudo unzip /opt/jboss/jboss-eap-8.0.*.zip -d /opt/jboss/
Make sure you replace the filename jboss-eap-8.0.*.zip to the actual one.
Change the ownership of the JBoss Web Server directory to the jboss user and group:
sudo chown -R jboss:jboss /opt/jboss/jboss-eap-8.0Step 5: Configure JBoss Web Server
Open the JBoss Web Server configuration file using your preferred text editor (e.g., nano, vi, vim):
sudo vim /opt/jboss/jboss-eap-8.0/standalone/configuration/standalone.xmlIn the standalone.xml file, locate the <server-identities> section and add the following line inside it to set the user and group under which JBoss EAP will run:
<permission-set name="default">
    <permission class="java.util.PropertyPermission" name="*" actions="read,write,upgrade"/>
</permission-set>
<user-identities>
    <user-identity>
        <user-name>jboss</user-name>
        <group-name>jboss</group-name>
    </user-identity>
</user-identities>
Save the changes and exit the text editor.
Step 6: Create a SystemD Service
To manage JBoss Web Server as a system service, create a new SystemD service file:
sudo vim /etc/systemd/system/jboss-eap.serviceAdd the following content to the file, replacing /opt/jboss/jboss-web-server-* with the actual path to your JBoss Web Server installation:
[Unit]
Description=JBoss EAP
After=network.target

[Service]
Type=simple
User=jboss
Group=jboss
ExecStart=/opt/jboss/jboss-eap-8.0/bin/standalone.sh -b 0.0.0.0
ExecStop=/opt/jboss/jboss-eap-8.0/bin/jboss-cli.sh --connect command=:shutdown

[Install]
WantedBy=multi-user.target
Save the file and exit the text editor.
Step 7: Start JBoss Web Server
Reload the SystemD daemon to recognize the new service:
sudo systemctl daemon-reloadStart the JBoss Web Server service:
sudo systemctl start jboss-eapTo check the status of the service, run:
sudo systemctl status jboss-eapStep 8: Enable JBoss Web Server to Start Automatically
If you want JBoss Web Server to start automatically after system reboots, enable the service:
sudo systemctl enable jboss-eapStep 9: Configure Firewall Rules (if applicable)
If you have a firewall enabled on your Red Hat system, you’ll need to open the necessary ports for JBoss Web Server. The default HTTP port is 8080, and the default HTTPS port is 8443. You can open these ports using the following commands:
sudo firewall-cmd --permanent --add-port=8080/tcp
sudo firewall-cmd --permanent --add-port=8443/tcp
sudo firewall-cmd --reload
Step 10: Access JBoss Web Server
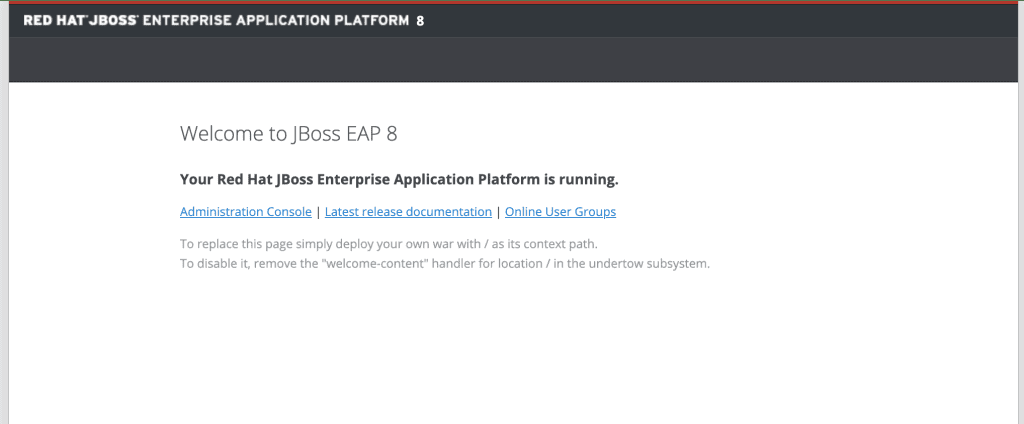
Once the installation is complete, you can access the JBoss Web Server welcome page by navigating to http://your-server-ip:8080 in a web browser.
Step 11: Manage JBoss EAP (Optional)
You can use the JBoss CLI (Command Line Interface) to manage and configure JBoss EAP. To connect to the running JBoss EAP instance, run the following command:
Copy code/opt/jboss/jboss-eap-8.0/bin/jboss-cli.sh --connect
This will connect you to the JBoss EAP CLI, where you can execute various commands to manage and configure the server.
That’s it! You have successfully installed and configured JBoss EAP 8.0 on your Red Hat system, following best practices for application server deployment. You can now start deploying your Java applications and taking advantage of the features offered by JBoss EAP.
Remember to consult the official JBoss EAP documentation for more advanced configuration options, security hardening, and performance tuning.